Become an Installer
Blog
June 1, 2026
The Anatomy of a Delamination Failure: Why Your Topcoat Peeled (And How to Prevent It)
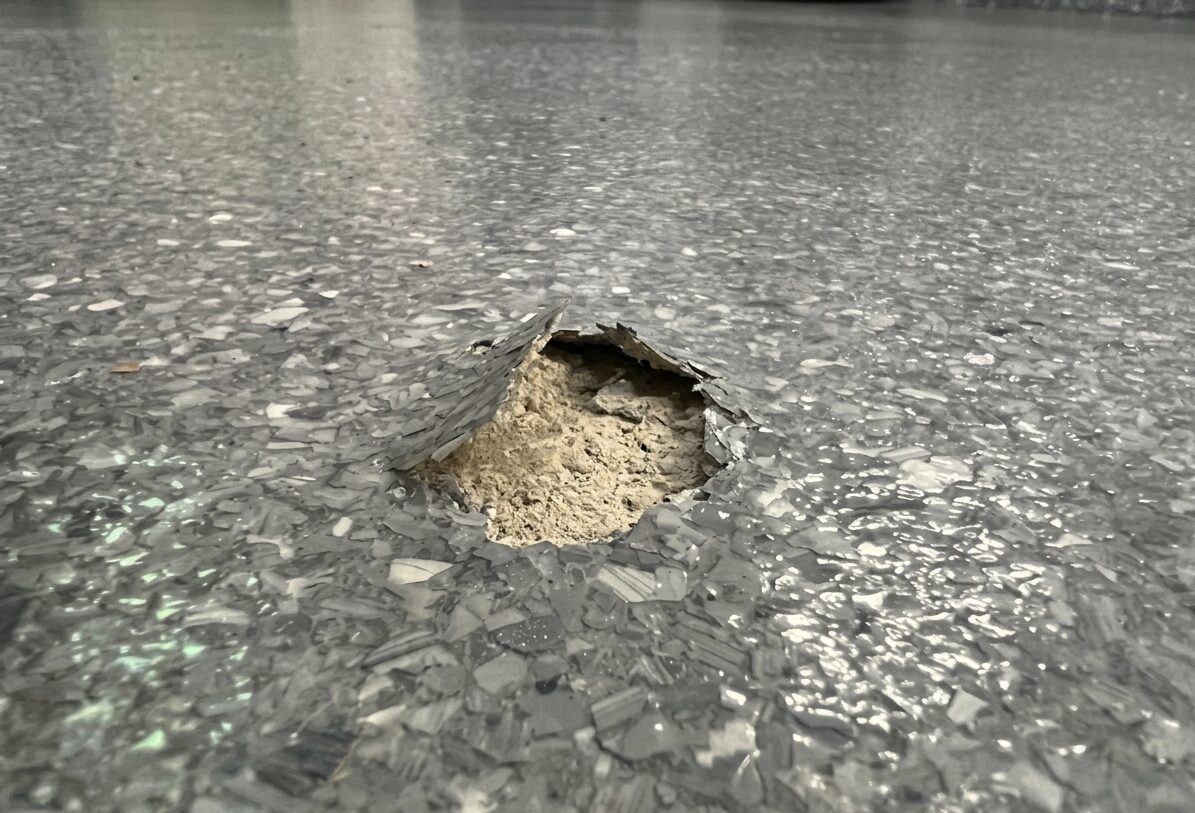
If you’ve ever watched a polyaspartic topcoat peel right off an epoxy base coat like a bad sunburn, you know the gut-punch that follows. The floor looked perfect at 6pm. By morning? Bubbles. Lifted edges. A customer blowing up your phone.
Epoxy topcoat peeling from a base coat is one of the most common — and most frustrating — failures in the decorative concrete world. And the worst part? It’s almost always preventable. The problem usually comes down to one of three things: you missed the recoat window, amine blush formed on the surface, or you didn’t prep between coats the right way.
What Is Intercoat Adhesion Failure (and Why Should You Care)?
Intercoat adhesion failure means the topcoat didn’t properly bond to the layer beneath it. Instead of chemically or mechanically locking to the base, it just… sits on top. And eventually, it lets go.
This shows up a few different ways:
- Full sheet delamination — large sections lifting off cleanly
- Edge lifting — especially near walls or transition points
- Bubbling or blistering — gas or moisture trapped at the interface
- Hot tire pickup — the topcoat sticks to warm car tires and peels off in chunks
That last one, polyaspartic hot tire pickup, gets blamed on the topcoat product itself. But 9 times out of 10, it’s an adhesion problem at the interface, not a product defect.
The Three Most Common Causes
1. Missing the Recoat Window
Every epoxy product has a recoat window. Apply too early and you risk trapping solvents or disrupting a coat that hasn’t set up yet. Wait too long, and the surface becomes too cured to accept a chemical bond. At that point, you’re relying entirely on mechanical adhesion (sanding). If you skipped that step because the base coat “looked fine,” you’ve got a problem waiting to happen.
In the field, schedules slip. A primer goes down late. A client needs access to part of the space. You get pulled to another job and come back the next afternoon instead of the next morning. These things happen. The question is whether your product system gives you any margin for error when they do.
2. Amine Blush — the Silent Killer
This one catches a lot of installers off guard.
Amine blush is a waxy, greasy film that forms on the surface of epoxy coatings when they cure in conditions with high humidity or low temperatures. The amine hardener reacts with moisture and carbon dioxide in the air and migrates to the surface, leaving behind a slick, whitish residue.
You might not even be able to see it. But when you roll your topcoat over amine blush, you’re not bonding to cured epoxy, you’re bonding to a wax layer. Which peels.
How do you know if you have it? Run your finger across the cured base coat. If it feels slick or slightly waxy, or if you see a hazy film in raking light, assume blush and clean accordingly. Warm water and a scrub pad can help, but in bad cases you may need to lightly abrade the surface.
Proper environmental controls during cure go a long way here. Keep ambient temps above 55°F and relative humidity below 80%.
3. Inadequate Surface Prep Between Coats
Even within the recoat window, a glossy cured epoxy surface can be too smooth for a topcoat to bite into. This is especially true with high-solids systems and self-leveling products that dry to a very tight, glassy finish.
Light sanding or scuffing between coats opens up the surface and gives the topcoat something to grab. It also removes any surface contaminants, dust nibs, or amine blush before they become buried under another layer.
A lot of installers skip this step when working on large commercial floors because it adds time. That’s understandable. But skipping it increases your risk, especially on topcoats with shorter adhesion windows or on surfaces that have been sitting longer than expected.
Why Application Windows Actually Matter on Real Jobs
Here’s the thing about recoat windows: the spec sheet is written for ideal conditions at 75°F. Your job is not always at 75°F. Your schedule is not always on time.
Wider application windows give you room to breathe. If an epoxy base coat has a longer recoat window, you have a lot more flexibility when the day doesn’t go as planned.
Optus Resin formulations are engineered with this in mind. Products like Opti-Flake and Floaterra are designed to work within real-world installation realities, not just laboratory conditions.
The Opti-Flake system uses a clear polyaspartic topcoat that’s light-stable and formulated for strong intercoat adhesion when applied over a properly prepared flake broadcast. The system is designed as an integrated stack — primer, base, flake, topcoat — where each layer is engineered to bond to the next. That coherence matters.
Floaterra is a self-leveling sinker-floater epoxy with 100% solids content and zero VOCs. It cures to a tight satin finish with strong mechanical properties. When the surface is prepped correctly and environmental conditions are within spec, you get a system that doesn’t give installers nasty surprises.
How to Prevent Topcoat Delamination — Practical Checklist
You don’t need to memorize adhesion chemistry to avoid failures. You need good habits.
Before you apply the topcoat:
- Check the manufacturer’s recoat window and compare it against actual elapsed time
- Inspect the base coat surface for amine blush (look for haze, test with your finger)
- Light abrade or scuff if you’re near the outer edge of the window or surface looks glossy
- Vacuum or blow off the surface (dust contamination is a real bonding inhibitor)
- Check ambient temp and dew point
- Keep RH in the proper range
During application:
- Don’t over-thin the topcoat — thinner means less body, less cohesion
- Maintain a wet edge and don’t overwork the material
- Broadcast flake immediately after the base layer goes down if you’re doing a flake system
After the job:
- Allow full cure before opening to vehicle traffic — typically 24 hours for foot traffic and up to 7 days for full cure
- Educate the customer on traffic timing; hot tire pickup complaints often come from owners who drove on the floor at 12 hours
When It’s Already Peeled: What Now?
If you’re dealing with an active delamination situation, here’s the realistic path forward:
- Assess the scope — is it isolated to an area, or is it widespread? Localized failures might be patched; widespread failures typically mean a full tear-out.
- Find the root cause — look at the failed areas. Does the topcoat have base coat residue on the back (adhesive failure at base)? Or is the topcoat clean (adhesive failure at interface)? This tells you which layer failed.
- Mechanical removal — a floor grinder with appropriate tooling is usually needed to get back to a sound substrate.
- Profile and reprime — a fresh CSP #2–#4 profile and a proper primer application set you up correctly for the redo.
- Don’t rush the redo — it’s tempting to move fast after a failure, but this is where the second failure happens.
The Bottom Line
Epoxy topcoat peeling from a base coat usually isn’t a random fluke. It’s amine blush you didn’t see, a recoat window you slightly exceeded, or a scuffing step you skipped on a Friday afternoon.
Using a product system built for real-world conditions gives you formulations that work together and application windows designed with installers in mind. But even the best products don’t overcome poor intercoat adhesion practices.
Know your window. Check for blush. Prep the surface. Those three habits alone will prevent most of the delamination callbacks you’ll ever have.